贝塞尔曲线动画问题(Swift修订版)
0x00 贝塞尔曲线与 Core Animation
众所周知, 在 iOS ,通过Core Animation能够制作出丰富的动画效果,比如缩放,颜色渐变,位移。Core Animation的作用对象是 CALayer,而这其中最重要的组合就是CAShapeLayer和UIBezierPath了。
通过对 CAShapeLayer 的 path 重新赋值,可以得到更多灵活可自定义的动画效果。
0x01 存在的问题
但是,如果不能正确地使用 path 来制作动画可能会得到意料之外的效果。比如我想使一个圆角矩形,变化成为一个圆形。如果使用如下的代码,你会发现实际的动画效果并不符合预期,而是会经历一个奇怪的形状变换。
1 | let fromPath = UIBezierPath(roundedRect: .init(x: 100, y: 300, width: 120, height: 40), cornerRadius: 20) |
那么,造成这种问题的原因是什么呢?翻阅 Apple 官方文档可以找到原因
If the two paths have a different number of control points or segments the results are undefined. If the path extends outside the layer bounds it will not automatically be clipped to the layer, only if the normal layer masking rules cause that.
这句话的意思就是如果两条路径拥有不同数量的控制点或者险段,那么最终的动画结果是不可预料的。因此直接使用不同的路径来生成动画是不可控的,除非前后的路径是一样的。
0x02 解决问题
发现了问题,接下来就是如何解决问题,这里提供两种方法。
创建具有相同数量的线段和点的路径
简单来说,第一种方法就是要保证动画足够简单,如果过于复杂则会消耗太多的时间与精力,得不偿失。
比如说,要使一个圆角矩形变换为一个圆,如果要使用路径来实现动画的话,只需要修改注释1处的代码:
1 | let fromPath = UIBezierPath(roundedRect: .init(x: 100, y: 300, width: 120, height: 40), cornerRadius: 20) |
这样我们的圆角矩形就能很流畅地变化成为一个圆形了。
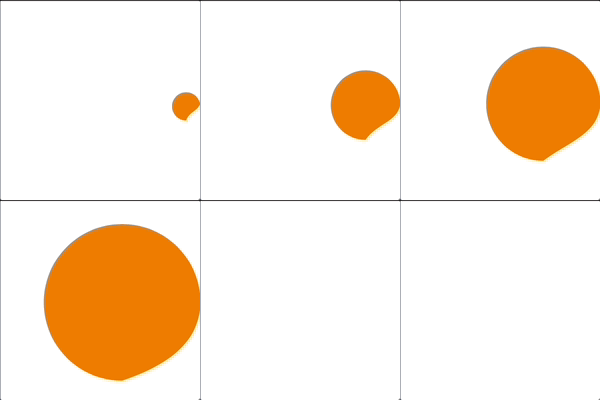
但是这种方法也并非每次都奏效,比如从一个1/4圆变化为一个半圆。
1 | let fromPath = UIBezierPath(arcCenter: view.center, radius: 100, startAngle: -.pi/2, endAngle: 0, clockwise: true) |
在 playground 中的运行结果如下:

可见,这种方法并不是绝对保险的。这就要使用到第二种方法了。
创建自定义的路径动画
这种方法其实就是将动画过程中的每一帧都手动绘制出来。由于整个动画的每一帧都是我们自己来绘制,因此就不会有动画过程不可控的情况发生。那么如何绘制动画过程中的每一帧呢?这就要用到自定义动画属性了。
我们首先创建一个自定义 layer,定义一个变量,这个变量可以随便取名,但是它一定是要和动画进度相关联的,比如说一个进度动画,我们需要的是从 0 到 100 的这么一个过程,那么我们定义的这个变量就得是 0 到 100 这个区间里的值。如下面例子中的 progress。
定义好变量之后,然后重写 needsDisplay(forKey:) 这个方法,其中默认的返回值为 false,将我们所需要改变的动画属性返回 true。此处的自定义 key 就是所定义的变量的名称。
最后就是在draw(in:)方法中绘制动画的每个阶段的图像,这样我们的自定义 layer 就算完成了。
⚠️注意,此处绘制需要根据 progress 的值来进行,以突出每一帧的变化。
1 | class SectorLayer: CALayer { |
那么如何让自定义 layer 的动画生效呢?也很简单,只需要加上一个常规的 CABasicAnimation,将 keyPath 设置为我们定义的变量名字,就可以正常运行了。
1 | private func startAnimation(for layer: SectorLayer) { |
下面就是自定义动画的结果。
⚠️重要
当动画 isRemovedOnCompletion 设置为 false,fillMode 设置为 forwards 时,在动画结束时,要手动将动画移除,否则 layer 将会一直进行重复绘制,造成无效的资源占用。